4번째 일지 22년 03월 17일
수업 때 한 번 짚어갔던 부분을 다시 짚으며 공부하는 시간을 가졌습니다.
요약
- 코드는 더보기로 접어놨습니다.
- EdgeInsets.all : 특정부분에 여백을 줄 때 사용 .all은 모두 .only(bottom,top,left,right)등 가능
- crossAxisAlignment / mainAxisAlignment : 크로스는 지금 방향과 역방향, 메인은 현 방향과 같은 방향
- softWrap : 텍스트가 영역을 넘어가면 자동으로 줄 바꿈을 할 것인가 물어보는 것
Building layouts
Learn how to build a layout.
docs.flutter.dev
Step 1: Diagram the layout
첫 번째 스텝에서 할 일은 레이아웃을 세분화하는 일입니다.
- Row와 Col 인식하기
- 레이아웃이 그리드를 포함하고 있는가
- 겹쳐지는 요소가 있는가?
- UI가 tap이 필요한가
- 정렬, 보드, 마진
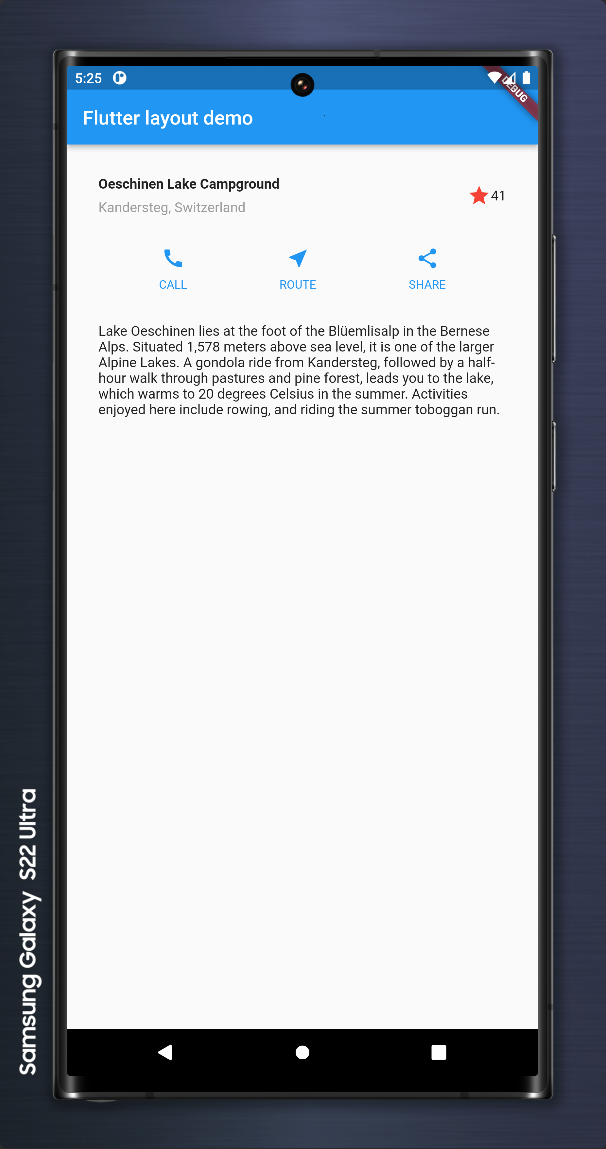
아래 화면을 보시면 크게 4개의 col(열)로 나누어지는 것을 확인할 수 있습니다.


그리고 2번째 열(col)을 자세히 보시면 또 3개의 children으로 나뉘는 것을 확인할 수 있습니다.
하나의 child는 텍스트가 2개의 열(col)로 나뉘어있고 한쪽에는 별 이미지와 별의 개수가 적혀 있습니다.
여기서 특이한 점은 텍스트 박스가 남은 빈 공간을 모두 차지하고 있다는 것인데 화면 크기에 따라 여백이 달라지고
그 여백에 글씨가 많이 들어가는 것이 가로로 아이콘이 커지는 것보다 필요한 일이라 그렇게 구현한 것 같습니다.

다음 3번째 열에서도 역시 3개의 children을 가지고 있고 각 child는 2개의 열로 나뉘어있는 것을 볼 수 있습니다.
Step2에서부터 본격적인 구현이 시작됩니다.
Step 2: Implement the title row
이번 스탭에서는 본격적인 구현이 시작되는데 여기서 좀 낯설거나 익숙지 않은 문장들을 찾아보면
EdgeInsets.all(숫자)인데 패딩에 들어간 것으로 특정 부분에 여백을 줄 때 사용하는 것 같습니다. left right top bottom 등 지정하여 주는 것도 가능합니다.
다음으로는 crossAxisAlignment와 MainAxisAlignment인데 기존 방향과 같은 방향으로 정렬, 기존의 역방향으로 정렬입니다. 현재 위에 step1에서 설명한 것처럼 열로 나뉘어 있으니 행을 기준으로 정렬하는 것이고 start, end, space between 등 다양한 방법으로 정렬이 가능합니다.
아래 접힌 글에 코드를 살짝 설명하자면
/*1*/ 부분의 코드를 통해서 텍스트가 빈 여백 모든 부분을 차지하도록 expanded 하였습니다.
/*2*/ 부분의 코드를 통해서 텍스트를 위아래로 배치하였습니다.
/*3*/ 부분의 코드를 통해서 아이콘을 그리고 숫자를 배치하였습니다.

// Copyright 2018 The Flutter team. All rights reserved.
// Use of this source code is governed by a BSD-style license that can be
// found in the LICENSE file.

import 'package:flutter/material.dart';

void main() {
  runApp(const MyApp());
}

class MyApp extends StatelessWidget {
  const MyApp({Key? key}) : super(key: key);

  @override
  Widget build(BuildContext context) {

    Widget titleSection = Container(
      padding: const EdgeInsets.all(32),
      child: Row(
        children: [
          Expanded(
            /*1*/
            child: Column(
              crossAxisAlignment: CrossAxisAlignment.start,
              children: [
                /*2*/
                Container(
                  padding: const EdgeInsets.only(bottom: 8),
                  child: const Text(
                    'Oeschinen Lake Campground',
                    style: TextStyle(
                      fontWeight: FontWeight.bold,
                    ),
                  ),
                ),
                Text(
                  'Kandersteg, Switzerland',
                  style: TextStyle(
                    color: Colors.grey[500],
                  ),
                ),
              ],
            ),
          ),
          /*3*/
          Icon(
            Icons.star,
            color: Colors.red[500],
          ),
          const Text('41'),
        ],
      ),
    );
    return MaterialApp(
      title: 'Flutter layout demo',
      home: Scaffold(
        appBar: AppBar(
          title: const Text('Flutter layout demo'),
        ),
        body: Column(
          children: [
            titleSection,
          ],
        ),
      ),
    );
  }
}
Step 3: Implement the button row
이 부분에서는 그다음 col에 있던 그림 3개와 텍스트가 2열로 나열된 파트를 구현합니다.
여기서 주목할 점은 MainAxisSize이며 이 부분을 min으로 하면 딱 차지하는 만큼만 공간을 가져가게 됩니다.
앞으로 다양한 코드들이 아래에 구현되어야 하므로 공간을 아끼는 것으로 생각됩니다.
그리고 이렇게 구현한 Column을 함수처럼 사용하여 하나의 위젯에 3번 나타냅니다. 이후 위젯 이름을 buttonSection이라고 나타냅니다.
여기서도 주목할 점은 색상인데 색상을 아래와 같이 나타내는 것을 알 수 있습니다.
Color color = Theme.of(context).primaryColor ;지금 이 위젯의 root 테마는 파란색이고 전체 콘텐츠의 primary 기본색인 파란색을 그대로 사용하는 것 같습니다.
Step 4: Implement the text section
이 부분은 그냥 단순하게 위젯을 만들고 텍스트를 쓰는 것인데 여기서 처음 보는 것은 softWrap 뿐입니다.
softWrap : 텍스트가 영역을 넘어가면 자동으로 줄 바꿈을 할 것인가 물어보는 것입니다.
 False의 경우 컨텐츠가 짤리는 것을 볼 수 있다. |
 트루의 경우 컨텐츠가 자동으로 줄을 바꾸는 것을 알 수 있다. |
아래 위젯을 추가하고 return MaterialApp 바디부분에 textSection을 추가한다.
Widget textSection = const Padding(
  padding: EdgeInsets.all(32),
  child: Text(
    'Lake Oeschinen lies at the foot of the Blüemlisalp in the Bernese '
    'Alps. Situated 1,578 meters above sea level, it is one of the '
    'larger Alpine Lakes. A gondola ride from Kandersteg, followed by a '
    'half-hour walk through pastures and pine forest, leads you to the '
    'lake, which warms to 20 degrees Celsius in the summer. Activities '
    'enjoyed here include rowing, and riding the summer toboggan run.',
    softWrap: true,
  ),
);
Step 5: Implement the image section
이미지를 다운로드해서 첨부하기만하면 완성인데 원래 나와있는 것과 다르게 주소로 첨부하고 싶으면 코드가 약간 달라집니다.
다운 받아서 사용할 땐 Image.assert 인터넷에 있는 주소로 사용할 땐 Image.network를 사용합니다.
assert를 사용할 땐 아래 사진에 보이는 pubspec.yaml에 꼭 추가를 한 후 network를 사용할 때와 같이 사용하면 됩니다.
코드는 아래에 접은 글로 추가해놓겠습니다.

화면이 작은 디바이스에서 스크롤을 내려 확인할 수 있도록 column에서 Listview로 마지막에 변경하였습니다.
// Copyright 2018 The Flutter team. All rights reserved.
// Use of this source code is governed by a BSD-style license that can be
// found in the LICENSE file.

import 'package:flutter/material.dart';

void main() {
  runApp(const MyApp());
}

class MyApp extends StatelessWidget {
  const MyApp({Key? key}) : super(key: key);

  @override
  Widget build(BuildContext context) {

    Widget titleSection = Container(
      padding: const EdgeInsets.all(32),
      child: Row(
        children: [
          Expanded(
            /*1*/
            child: Column(
              crossAxisAlignment: CrossAxisAlignment.start,
              children: [
                /*2*/
                Container(
                  padding: const EdgeInsets.only(bottom: 8),
                  child: const Text(
                    'Oeschinen Lake Campground',
                    style: TextStyle(
                      fontWeight: FontWeight.bold,
                    ),
                  ),
                ),
                Text(
                  'Kandersteg, Switzerland',
                  style: TextStyle(
                    color: Colors.grey[500],
                  ),
                ),
              ],
            ),
          ),
          /*3*/
          Icon(
            Icons.star,
            color: Colors.red[500],
          ),
          const Text('41'),
        ],
      ),
    );
    Color color = Theme.of(context).primaryColor ;

    Widget buttonSection = Row(
      mainAxisAlignment: MainAxisAlignment.spaceEvenly,
      children: [
        _buildButtonColumn(color, Icons.call, 'CALL'),
        _buildButtonColumn(color, Icons.near_me, 'ROUTE'),
        _buildButtonColumn(color, Icons.share, 'SHARE'),
      ],
    );

    Widget textSection = const Padding(
      padding: EdgeInsets.all(32),
      child: Text(
        'Lake Oeschinen lies at the foot of the Blüemlisalp in the Bernese '
            'Alps. Situated 1,578 meters above sea level, it is one of the '
            'larger Alpine Lakes. A gondola ride from Kandersteg, followed by a '
            'half-hour walk through pastures and pine forest, leads you to the '
            'lake, which warms to 20 degrees Celsius in the summer. Activities '
            'enjoyed here include rowing, and riding the summer toboggan run.',
        softWrap: true,
      ),
    );

    return MaterialApp(
      title: 'Flutter layout demo',
      home: Scaffold(
        appBar: AppBar(
          title: const Text('Flutter layout demo'),
        ),
        body: ListView(
          children: [
            Image.network(
              'https://raw.githubusercontent.com/flutter/website/master/examples/layout/lakes/step5/images/lake.jpg',
              width: 600,
              height: 240,
              fit: BoxFit.cover,
            ),
            titleSection,
            buttonSection,
            textSection,
          ],
        ),
      ),
    );
  }

  Column _buildButtonColumn(Color color, IconData icon, String label) {
    return Column(
      mainAxisSize: MainAxisSize.min,
      mainAxisAlignment: MainAxisAlignment.center,
      children: [
        Icon(icon, color: color),
        Container(
          margin: const EdgeInsets.only(top : 8),
          child: Text(
            label,
            style: TextStyle(
              fontSize: 12,
              fontWeight: FontWeight.w400,
              color: color,
            ),
          ),
        ),
      ],
    );
  }
}
'Flutter > 개발일지' 카테고리의 다른 글
| [Flutter/개발일지7] Get to know Firebase for Flutter 리뷰 (0) | 2022.05.02 |
|---|---|
| [Flutter/개발 일지 5] Building beautiful UIs with Flutter (0) | 2022.04.07 |
| [Flutter / Android Studio] 안드로이드 스튜디오 에뮬레이터 디자인 바꾸기 (0) | 2022.03.18 |
| [Flutter/개발 일지 3] Write your first app 2편 무작정 해석하며 따라하기 (0) | 2022.03.08 |
| [Flutter/개발 일지 2] Write your first app 무작정 해석하며 따라하기 (0) | 2022.03.07 |


